In Item Maintenance, you can add, change or delete an item.
Common Tasks
Add
an Item
Run Item Reports
Restock Closets
Receive Inventory
Establish Par Levels
Count Inventory
Create Purchase Orders
To Display all Items
From the ChargeTracker Main Menu, double-click Work with Items. The Item Maintenance browse window will appear.

To Sort the Item Maintenance List
Click any column header to sort by that selection. The header that is bold indicates the current sort order. For example, in the picture above, the item list is sorted by item Description.
To Filter the Item Maintenance List
The selection filters for Item Status, Category, and Facility can be used to control which items are displayed in the item maintenance browse list. Only items that have the status selected in the Item Status selection, and have the item category selected in the Category selection, and were created by the Facility selected, will be displayed. In order to see all items regardless of item status, category, or which facility created those items set each selection to All.
Item Status – Controls which items are displayed based on their status using the Discontinued and Item not in Use checkbox within the item information. Note: If the Category or Facility filters are set to anything other than All, this will also affect which items are displayed.
All – All items that have been added to the item maintenance regardless of their status will be displayed.
Discontinued - Items that have been marked as Discontinued on the Item Maintenance screen and are no longer visible by default.
Available - Items that have not been marked as Discontinued and are available for use by all facilities.
Available/Not in Use - Items that have not been marked as Discontinued but have been marked as Not in Use on the item's stock levels tab by your facility.
In Use - Items that have not been marked as "Not in Use" on the item's stock levels tab by your facility regardless if the item is available or discontinued.
Category - Select the Item Category drop-down list to view only items listed in a selected category. Note: If the Item Status or Facility filters are set to anything other than All, this will also affect which items are displayed.
Facility - The Facility drop-down box will display only items created by the selected facility. Your facility, the corporate facility, or All facilities are the options in this list. Note: If the Item Status or Category filters are set to anything other than All, this will also affect which items are displayed.
Note: Each of the item list selections, Item Status, Category, and Facility are linked and will work to only show items that meet the criteria set by each of the selections.
Example: If the item status selection is set to In Use, the category selection set to All Categories, and the facility selection set to Facility 1, then only items that were created by a Facility 1 user, with any category, and that have not been marked as Not in Use will be displayed in the list. Items created by Corporate which are also In Use will not be displayed in this example because only Facility 1 was selected in the facility select list.
Fields to Complete on Item Maintenance window- * indicates required entry
The Stock Levels tab displays On-hand quantity and par level of items in all stockroom locations.
Notes:

Low Level - When the on-hand quantity goes below the low level quantity, the item should be re-ordered. This applies to Central Supply only.
The Inventory Control tab displays all physical counts, receivings and transfers for the stockroom(s) and date range selected.
To add a new physical inventory count, item receiving, or item transfer, click the Add Record button.
Click the Add Transfer button when transferring items from one stockroom location to another.
![]()
From - Choose the location the item was transferred from
To - Choose the location the item was transferred to
DateTime - Click the calendar icon, then choose the date and time the item transfer took place
Quantity - Enter the quantity (in unit of issue) of the item transferred
Click the Add Physical button when taking a physical inventory of stockroom items.
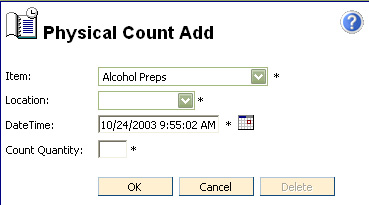
Location - Choose the location where the item was counted
DateTime - Click the calendar icon, then choose the date and time the item was counted
Quantity - Enter the quantity (in unit of issue) of the item counted
Click the Add Receive button when recording item receivings.
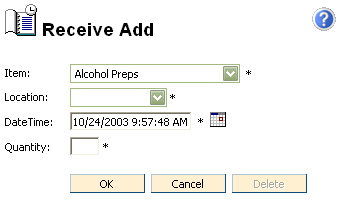
Location - Choose the location where the item was received
DateTime - Click the calendar icon, then choose the date and time the item was received
Quantity - Enter the quantity (in unit of issue) of the item received
Cost information is required if you want to use the Purchase Order function in the system.

On the Item Maintenance window, click the Cost tab to display the Cost browse. Double click a specific line on the browse to display a detail window for the item cost selected.
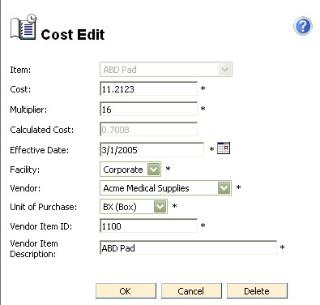
Cost - What the facility pays for the item (in unit of purchase)
Multiplier - This is the number of units of issue in a unit of purchase for this item
Calculated Cost - This field automatically calculates the unit cost. Formula used is:
Cost/Multiplier = Unit Cost
Facility - Costs can be facility-specific, or if Corporate facility is selected, the same cost is available for use by all other facilities.
Effective date - Effective date of the displayed cost
Vendor - The cost displayed is from the vendor selected
Unit of Purchase - This is the unit of measure regarding the item is packaged when purchased by the facility. For example Box of 10.
Vendor Item Id - Vendor's unique identifier for the item
Vendor Item Description - Vendor's unique item description for the item
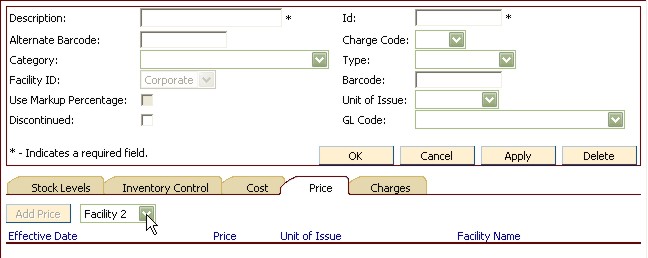
The price tab displays all established prices for an item.

Double click a price to display the detail price window.
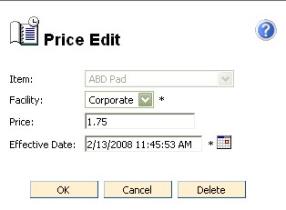
Facility - Prices can be facility-specific, or if Corporate facility is selected, the same price is available for use by all other facilities.
Price - This is what the resident pays for the item
Effective Date -The date when the current price became effective
To Add a New Price

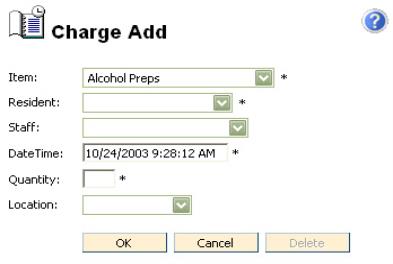
The Charges tab displays all activity/charges for the current item. Choose from the Charge Date pop up list, the date range of charges to display.
To Add a Charge
To Edit an Item
To Filter by Item Category
To Filter by Item Status
Use the Item status drop-down list to view all items or items that are Available, Available/Not in Use, Discontinued, or In Use.
Discontinued - Items that have been marked as Discontinued on the Item Maintenance screen and are no longer visible by default. This is commonly used by Corporate to control which items are available for facility use.
Available – Items that have not been marked as Discontinued and are available for use by all facilities.
Available / Not In Use – Items that have not been marked as Discontinued but have been marked as Not In Use on the item’s stock levels tab. This may commonly be used to see items that are available from corporate but that are not being used by the facility.
In Use – Items that have not been marked as “Not in Use” on the item’s stock levels tab. This is commonly used at the Facility level to control which items in the list of Available items are used by the facility.
To Run Item Reports