Fields to Complete on Item Information window- * indicates required entry
The Stock Levels tab displays On-hand quantity and par level of items in all stockroom locations.
Notes:
1. Location 1 must be designated as Central Supply.
2. Low level quantity applies to Central Supply only.
3. Par and Low Level information for Central Supply must be entered if
you want to use the Purchase Order function.

Low Level - When the on-hand quantity reaches the low level quantity, the item should be re-ordered. This applies to Central Supply only.
The Inventory Control tab displays all physical counts, receivings and transfers for the stock room(s) and date range selected.
To add a new physical inventory count, item receiving, or item transfer, click the Add Record button.

From the Inventory Control tab, click the Add Record Button, then click the Add Transfer button when transferring items from one stockroom location to another.
![]()
From - Choose the location the item was transferred from
To - Choose the location the item was transferred to
DateTime - Click the calendar icon, then choose the date and time the item transfer took place
Quantity - Enter the quantity (in unit of issue) of the item transferred
Click the Add Physical Count button when taking a physical inventory of stockroom items.
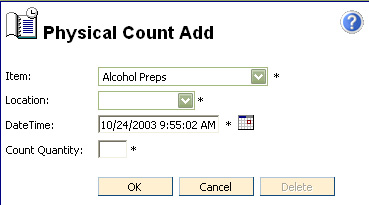
Location - Choose the location where the item was counted
DateTime - Click the calendar icon, then choose the date and time the item was counted. Current date and time will already be displayed in the field.
Quantity - Enter the quantity (in unit of issue) of the item counted
Click the Add Receive button when recording item receivings.
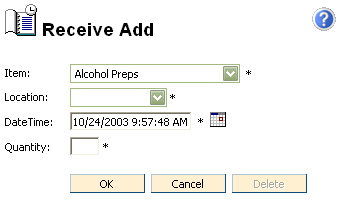
Location - Choose the location where the item was received
DateTime - Click the calendar icon, then choose the date and time the item was received. Current date and time will already be displayed in the field.
Quantity - Enter the quantity (in unit of issue) of the item received

Cost * - What the facility pays for the item
Unit of Purchase - This is the unit of measure regarding the item is packaged when purchased by the facility. For example Box of 10.
Multiplier * - This is the number of units of issue in a unit of purchase for this item.
The price tab displays all established prices for an item. See Calculated Price and Markup Percentage under Item Cost in this topic for details of how price markup is set up and determined.

Price *- This is what the resident pays for the item
Price Effective Date -The date when the current price became effective
Add Price - Click the Add Price button to add a new price. Enter the correct price in the price field, and click the calendar icon, choosing an appropriate effective date for the price.

The Charges tab displays all activity/charges for the current item. Choose from the Charge Date drop down list, the date range of charges to display.
To add a new charge, click the Add Charge button. The Charge Add screen will appear.
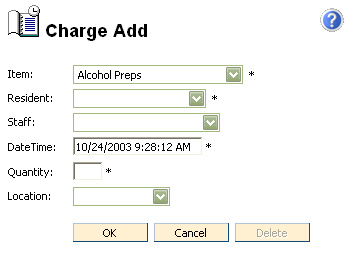
Resident - Choose the resident who is receiving the item
Staff - Staff member who administered the item to the resident
DateTime - Click the calendar icon, then choose the date and time the charge was given. Current date and time will already be displayed in the field.
Quantity - Enter the quantity of the item issued to resident
Location - Choose the stockroom location the item was stored prior to giving it to the resident