You are here: CareTracker Help > ChargeTracker > ChargeTracker Resident

Resident Maintenance
The Resident Maintenance window displays a list of residents in table
(browse) format.

To Add a Resident
- Under Common Tasks
click Add a Resident.
- Type information
for the resident in the fields provided.
- Click Okay to save
and exit the resident window.
Notes:
- Clicking Cancel will
exit the window without saving changes.
- Clicking Apply will
save changes but not exit the window.
- Fields that display
an asterisk (*) must be filled in.
Fields to complete on the Resident Maintenance
window
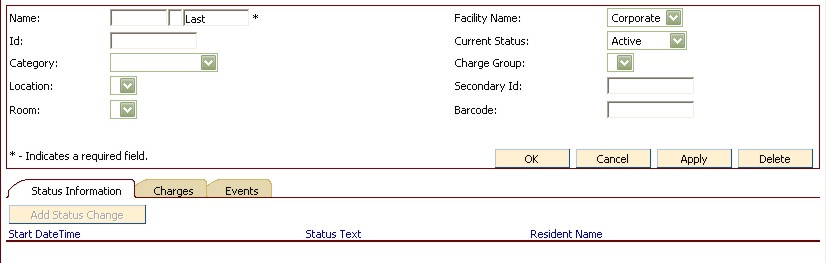
- Name
- First name, Middle Initial, Last name
- Id
- Sometimes matches the medical record number.
- Category
- Sometimes reflects the resident's insurance type. The
field is user defined.
- Add a new category
by selecting the New Category field from the drop down box.
- New categories
may also be added in Setup Information.
- Location
- Section or wing of facility where resident resides.
- Room
- Room where the resident resides.
- Facility
Name - Facility where resident resides.
- Current
Status - Choose an appropriate status for the resident from the
drop down list. Examples
of typical status codes are: Active,
Hold, Discharged.
- Charge
Group - A user defined field. Choose
appropriate charge group for the resident. New
charge groups can be added in ChargeTracker Setup.
- Secondary
Id - Alternate Id for resident.
- Bar
Code - Bar Code number assigned to the resident. Scanning
of bar codes help link charges to residents.
To Sort Resident Information
Click the header of each column to sort by that column. For
example, to sort the resident list by resident last name, click the word
Last at
the top of the last name column.
To Include Dismissed Residents
Click the Show Dismissed Residents check box.
To Filter by Resident Category
To display only residents from a specific resident category, choose
the desired category from the pop up list. This pop up list is in the
upper right corner of the Resident Information window.
For example, if you want to see only residents that have a category
of Skilled, choose Skilled from the Category pop up list.
To Change Resident Information
- To Edit Resident Information, double click a resident
in the resident browse list
- Make the necessary changes in the window that
appears.
- Click Ok to save changes and return to the resident
browse window.
Status Tab
The Status tab on the Resident Information window displays all resident
status records that have been added for the current resident. Click
the Add Status Change button
to change the status for the resident. To
delete a status, double click the status to be deleted, then hit the Delete
button.
Note: Resident
Status may also be changed by clicking the down arrow to the right of
the Resident Status field, then choosing a new status. The
status change will be reflected on the Status Information tab.
Charges Tab
The Charges tab on the Resident Information window displays charges
that have been added for the current resident. Choose
from the Charge Date pop up list the range of activity to be displayed.
Options
include Today, Last 7 Days, etc.
To Add an Charge for a Resident
- From the Resident Browse Window double-click the
resident that will receive the item. The
Resident Information detail window will appear.
- On the Activity tab, click Add a Charge. The
Charge Add window will appear.
- Fill in the fields, choosing the appropriate item,
resident, date/time, quantity and location. Note:
the fields with an asterisk must have an entry.
- Click Ok to save changes and exit the Charge Add
window.
Events Tab
Events are "automatic charges" set up on a resident level
so that a repetitive charge can be made without manually doing the charge
each time.
To Add or Edit an Event
To Run Resident Reports
- Click Run Resident Reports. (Upper
left corner of Resident Information window, under Common Tasks.)
- Make appropriate selections from all filter boxes.
- Click Run Report.
See Also
Merge Resident Wizard