To Add a New Machine
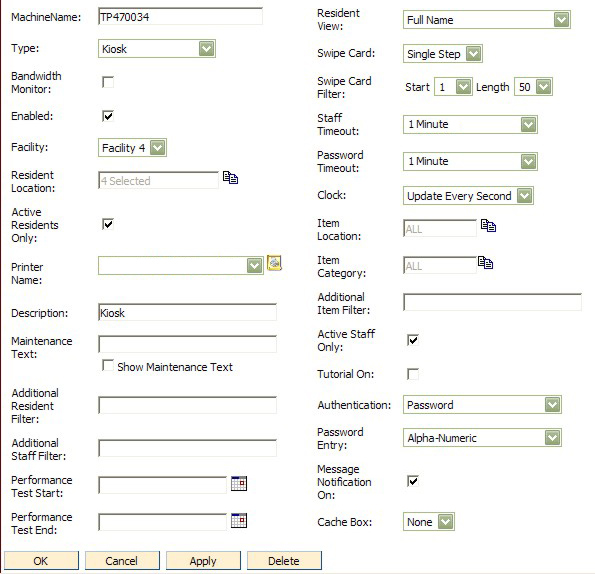
Machine Name - Network name assigned to this machine.
Type - Choose from the drop down list machine type: Kiosk. Also available are Workstation, Disconnected Kiosk, Mobile and Cache Box. See descriptions for these machine types below.
Click here if setting up a new workstation
Click here if setting up a new mobile device
Click here if setting up a new disconnected kiosk
Click here if setting up a new cache box
Note: It is required that the appropriate number of kiosk licenses are registered to CareTracker before another machine is added. See “Install Modules and Kits” for more information.
Bandwidth Monitor - Mark this check box to continually poll kiosk sending an alert by email if network or kiosk is not functioning.
Enabled - Mark this check box to activate access for this machine.
Facility - Choose from the drop down list the facility in which this machine is used.
Resident Location - Choose a location from the drop down list to display residents on the kiosk from a specific resident location or all locations.
Active Residents Only - Mark this check box if you only want active residents to display on the kiosk resident list.
Printer Name - Choose from the drop down list the printer where hard copy reports will be printed.
Description - Brief description of the kiosk/machine.
Maintenance Text - Enter text to display on the kiosk to let staff know that maintenance is being performed on the kiosks making them unavailable for use until the maintenance is complete.
Note: This field is only to be used when it is time to perform the maintenance, as the message will display immediately.
Show Maintenance Text - This field is only to be used when it is time to perform the maintenance, as the maintenance text message will display immediately.
Additional Resident Filter - Residents that are loaded to the kiosk can be filtered using the Resident Filter field. Default setting excludes all dismissed residents from kiosk view. Please contact your Resource/CareTracker representative for assistance in setting up this filter.
Additional Staff Filter - Staff members that are loaded to the kiosk can be filtered using the Staff Filter field. Default setting excludes all inactive staff members from kiosk view. Please contact your Resource/CareTracker representative for assistance in setting up this filter.
Performance Test Start - Choose from the calendar the date and time to start kiosk performance testing.
Performance Test End - Choose from the calendar the date and time for the kiosk performance testing to end.
Resident View - Choose from the drop down list the desired format to be used when displaying the resident name (under the wheelchair) on the kiosk. Selections include: Full name, Initials and last name, Initials only, Room number, No resident name, Last name and ID, and Last Name and Room number.
Note: When in kiosk, touch resident icon and the resident's full name will be displayed for five seconds.
Swipe Card - Choose from the drop down list Swipe Card method:
Swipe Card Filter - If leading/trailing characters need to be read/filtered on a staff swipe card, choose appropriate starting position and length of bar code from drop down lists provided.
Staff Timeout - Choose from the drop down list the number of minutes/seconds the kiosk will wait (with no user input) before going to the Staff Password screen.
Clock - Choose from the drop down list how often the clock on the kiosk should be refreshed or if the clock should be hidden.
Active Staff Only - Mark this check box if you only want to display active staff on the kiosk staff list.
Item Location - Controls which location(s) will be shown on the location screen on the kiosk for Charge or Transfer.
Charges
Transfers
Item Category - Controls which items will be displayed on the kiosk for Charge or Transfer based on the item's category.
Additional Item Filter - Items that are loaded to the kiosk can be filtered using the Additional Item Filter field. Please contact your Resource/CareTracker representative for assistance in setting up this filter.
Note: Items that have been marked as Not in Use will not appear on the kiosk. This is the default kiosk setting and cannot be changed.
Active Staff Only - Mark this checkbox if you only want to display active staff on the kiosk staff list. This checkbox is marked by default.
Tutorial On - Mark this checkbox to enter tutorial mode on the kiosk. This is used in when training staff and does not add assessments to the "live" observation database.
Authentication - Choose from the drop down list, the type of authentication your facility uses at staff log-in. Choices are: Password or Digital Persona Biometrics.
PIN Entry - Allows the user to choose between numeric only PINS and alpha-numeric PINS (which displays a full keyboard instead of a numeric entry form).
Message Notification On - Activating message notification notifies staff of a new message immediately after the staff member logs into the machine.
Cache Box- Select from the drop-down list the cache box associated with this kiosk (if applicable).