
CareTracker - Edit Resident Information
- To edit Resident Information, double click a resident
in the resident browse list
- Make the necessary changes in the window that
appears.
- Click Ok to save changes and return to the resident
browse window.
Fields to complete on Resident Information window
- Name
- First name, middle initial, last name
- Id
- Sometimes matches the medical record number
- Category
- Sometimes reflects the resident's insurance type. The
field is user defined.
- New categories
are added in Setup Information.
- Location
- Section or wing of facility where resident resides. Locations
are used to filter residents on the kiosks.
- Room
- Room number where the resident resides.
- Facility
Name - Choose from the drop down list the appropriate facility
name where this resident resides.
- Current
Status - The current status field displays the status of the resident
including the following three selections: Active,
Hold, and Discharged. The
Status History tab on the resident window displays detailed history of
the resident's status, including status start and stop date/time.
- Primary
Assessment Start - This is day one of the MDS schedule and will
typically match the R2B date of the resident's last quarterly assessment.
The assessment
date must be set in order for the lights on the kiosk to turn on for the
resident. Click the calendar button directly to the right of the Primary
Assessment Start field, to edit the date.
- Primary Start Date
Calculator - Click the calendar button
with magnifying glass to access the primary assessment group start date
calculator window.
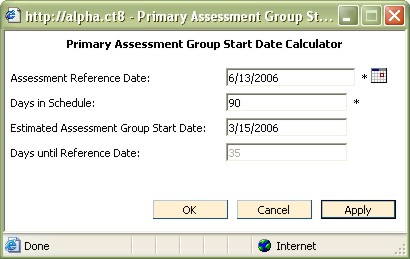
- Click
the calendar button to the right of the Assessment Reference Date field
and choose the projected
assessment reference date for the resident.
- In
the Days in Schedule field, enter the number of days in this assessment
period. Click
the Apply button.
- The
Estimated Primary Assessment Start Date will appear in the following field.
- Number
of days until the projected reference date will appear on the screen also.
- Primary
Assessment Group - Choose from the selection list the appropriate
primary assessment group for the resident. This
is the main assessment group for the resident, and most often consists
of typical assessments that are constant across many residents. Only
one Primary assessment group may be selected for each resident.
- Secondary
Assessment Group(s) - Choose
from the selection list the appropriate secondary assessment group(s)
for the resident. The
secondary assessment groups are used to turn on lights that are additional
to the Primary group, and most often consist of unique or resident specific
assessments. Multiple secondary assessment groups may be selected.
- Family Communication Settings - When Family Communication Settings are Enabled for a Resident, it will make the buttons and links available to send an email to the family members/contacts of the Resident in the “Enter Additional Resident Information”.
Enabled – Check the box to activate the buttons on the Family Update window and the link on the Resident Maintenance.
Frequency - Set a frequency for the number of days until the next Family Update is due based on the last Family Update that was sent.
For example: If the last Family Update was sent to the family members on 1/1 and there is a frequency of 7, the next Family Update would be due on 1/8.
Resident
Picture
Resident pictures can be loaded into CareTracker. The pictures appear
on the kiosk and the resident information screen allowing staff to make
a positive identification of residents. This is especially applicable
to facilities with agency staff.
Picture Requirements
- Aspect Ratio: 2:3
(i.e., 3.5x5 OR 4x6).
- Must be a .JPEG or
.GIF.
Note:
Adding
pictures could affect kiosk performance.
To Add or Edit a Resident Picture
- From the Resident Information screen, under Common
Tasks, choose Click to Edit Picture.
- Click the Browse button. You can browse to anywhere
on your system to select the picture. When you select the picture file
and click OK, CareTracker will place a copy of it in the CareTracker database
for use.
Status Information Tab
The Status Information tab will display all status additions and changes
for the current resident. Click
the Add Status Change button
to change the status for the resident.
Scheduling Information Tab
The Scheduling Information tab will display all series that have been
scheduled for the current resident.
Scheduling Detail Tab
The Scheduling Detail tab displays the time and date scheduled for each
series for this resident. The
Schedule Date drop down box can be used to select a time frame of scheduling
information to review. It
will take the system longer to display all of the corresponding schedule
information for larger time frames.
Observation Tab
The Observation tab on the Resident Information window displays observations
that have been added for the current resident. Choose
from the Observation Date pop up list the range of observations to be
displayed. Options
include Today, Last 7 Days, etc.
To Add an Observation Record for a Resident
- From the Resident Browse window double-click the
resident that will receive the item. The
Resident Information detail window will appear.
- Click on the Observation tab at the bottom of
the resident information window, and select Add Observation.
- This will display the Kiosk view, allowing you
to document only on the selected resident. Go
through the kiosk, choosing the appropriate information.
- Click Exit on the kiosk to save changes and exit
the Observation Add window.
- Select Refresh under the Observation tab to view
newly created information.
Note: Once an observation has been added, only the date on the observation
can be changed. The
observation record can be deleted. If
the observation date is changed, or the observation record is deleted,
a mandatory history note window will appear where the staff member can
document why the change was made.
Family Communications Tab
The Family Communications tab displays the list of past messages for the resident.
Note: This is only the information that the CareTracker system passed to the staff member(s) local email client and may not be an actual representation of what was sent to the family had the staff member made modifications in their email client.
MDS Assessments Tab
The MDS assessments tab will show all of the current and past MDS assessments for the selected residents. You can view past MDSs, and you can open current MDS assessments in order to complete the assessment and submit it to CMS.
Leave of Absence Tab
The leave of absence (LOA) tab allows users to enter any LOA dates for residents in order for the scheduling view to display MDS schedules appropriately. The LOA dates will impact the following areas in MDS Scheduling: ARD date range, ARD Due Date, Payment Zones, Milestone Date Ranges. The LOA dates will also be taken into consideration on the MDS Billing Report.
To add an LOA:
1.Tap the “Add Leave of Absence” button.
2.Select a Date.
3.Enter a reason for the LOA.
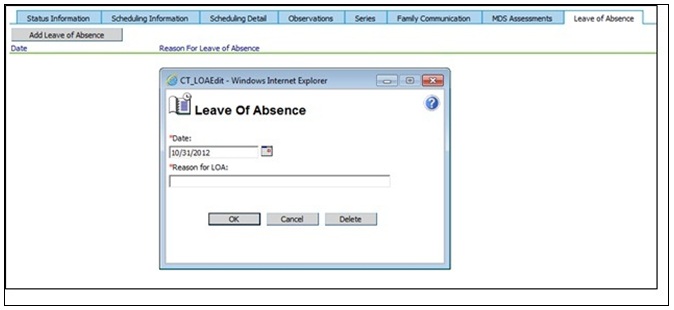
To remove an LOA:
4.Double click on the LOA you would like to remove.
5.Tap “Delete.”
Resident Specific Series
To add a series that is specific to a resident
- From the Resident Information window, select the
Series tab.
- Click the Add/Edit Resident Series button. The
Kiosk screen will appear.
- Select the Category that the series applies to.
- Click the "Add Series" button. Click
the blue help button for instructions on how to add a new series.
- After adding the series, click on the series button
to add the questions and choices. Click
Ok to save the series. The
new series will be displayed on the Series tab in Resident Information.
- To add the new series to the resident's schedule
(turn on the light), in Resident Information, click on the "pieces
of paper" to the right of the Secondary Assessment Group field.
- Click the "Add group for resident" button.
In the
window that appears, type a name for the new resident specific assessment
group and click Ok.
- The Edit Assessment Group for resident window
will appear.
- Click Add or Remove an existing assessment time
link. Choose
an existing assessment time if one exists, or click on Add a new assessment
time, to create a new one. Click
the blue help button for instructions regarding how to add a new assessment
time. Click
Ok to save.
- The newly added assessment time will appear on
the resident's Edit Assessment group window. Click
the assessment time link, then scroll through the series to find the resident
specific series that was added in Step 4 above. Note:
all resident specific series will be red text and will say "Resident
only." Click
Ok to save.
- Enter start and end dates for the new resident
specific assessment group, and click Ok to save.
- The new assessment group will be displayed on
the resident's Assigned Secondary Assessment Groups list and will display
a lighted button on the kiosk at the appropriate scheduled time.
Common Tasks
Create resident profile -
Under Common Tasks, click Create Resident Profile to add a new Resident
Profile type message. Resident Profile messages ONLY show up when going
through the resident - not at the message center and are not available
on any list of messages. Any
staff member with access can edit this type of message. If
a staff member edits a resident profile message and selects OK, a prompt
will ask them if they want the message to be acknowledged all over again
- YES/NO. Resident
profile messages will always be at the top on the KIOSK. Profile
messages ONLY show up when going through the resident - not at the message
center, and are not available on any list of messages.
View messages for this resident -
This link displays any existing messages for the currently selected resident
and provides an opportunity to create a new resident message.
Resident
Specific messages are available on the kiosk under the MORE INFORMATION
button after selecting the resident. If
there is a new message or a changed message in regard to the selected
resident, the MORE INFORMATION button is YELLOW. The
staff member has to acknowledge the message to turn the light off.
Resident/Individual Analysis This link displays the Clinical Intelligence viewer for the resident with the last 30 days of observations that are in the Clinical Intelligence system.
Add/Edit Resident Programs - Use the Add New Resident Program window to add or edit resident programs.
Modify Resident Name/ID # - Use this link for the ability to change the Resident’s Name and ID number.
See Also
Find Resident Wizard