
Resident Category Information
To Access Resident Category Information
- From the CareTracker Main Menu window, choose
Setup Information.
- From the CareTracker Setup window, choose Resident
Setup Information. Click
the Resident Category tab.
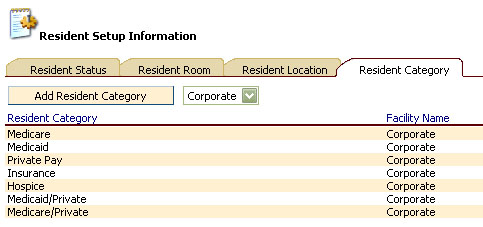
Existing resident categories will be displayed.
Note:
if logged
in as a Corporate user, the categories added by Corporate will displayed.
If logged
in as a Facility user, only the categories unique to that facility will
be displayed (security may prevent you from viewing category codes that
were added by Corporate).
To Add a New Resident Category
- In Resident Setup Information,
on the Resident Category tab, click the Add Resident Category button.
The Resident
Category window will appear.
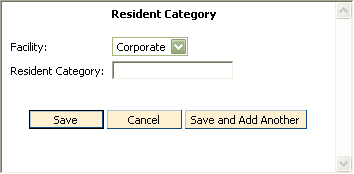
- Click the down arrow
to the right of the Facility Name field to choose your facility.
- Type in the new Category
name in the Resident Category field.
- Click Save. To add
multiple categories, click the "Save and Add Another" button.
Click Cancel
to exit the window without saving changes.
To Edit a Resident Category
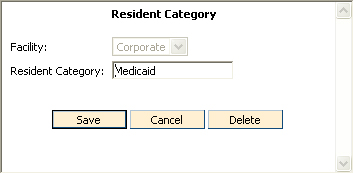
- To
change Resident Category, highlight the existing text then type in the
new Category name.
- Click
the Save button to save changes. Click
Cancel to exit without saving changes.
To Delete a Resident Category
Only Categories that are not in use may be
deleted.
- From the CareTracker Main Menu window, choose
Setup Information.
- From the CareTracker Setup window, choose Resident
Setup Information.
- From the Resident Setup Information window, click
the Resident Category tab.
- Double click the Resident Category you wish to
remove.
- From the Resident Category window, click the Delete
button.